You chose a Craftsman for its warmth and character, but translating that charm into a high-impact listing takes a specific plan. Buyers in Burlingame expect original details to shine, strong photography, and an easy-to-imagine lifestyle. In this guide, you’ll learn exactly how to stage your Craftsman for maximum appeal, from curb to kitchen to camera. Let’s dive in.
Why Burlingame buyers love Craftsman
Burlingame’s tree-lined streets, walkable downtown, and convenient Peninsula location draw buyers who value historic character alongside modern comfort. Many look for original woodwork, built-ins, and inviting porches, paired with bright, well-styled interiors. Your staging should highlight these features and signal move-in readiness.
When you stage for Burlingame, balance preservation with today’s needs. Showcase the craftsmanship while emphasizing functional areas such as a dedicated workspace, an efficient kitchen, and usable outdoor living.
Core features to highlight
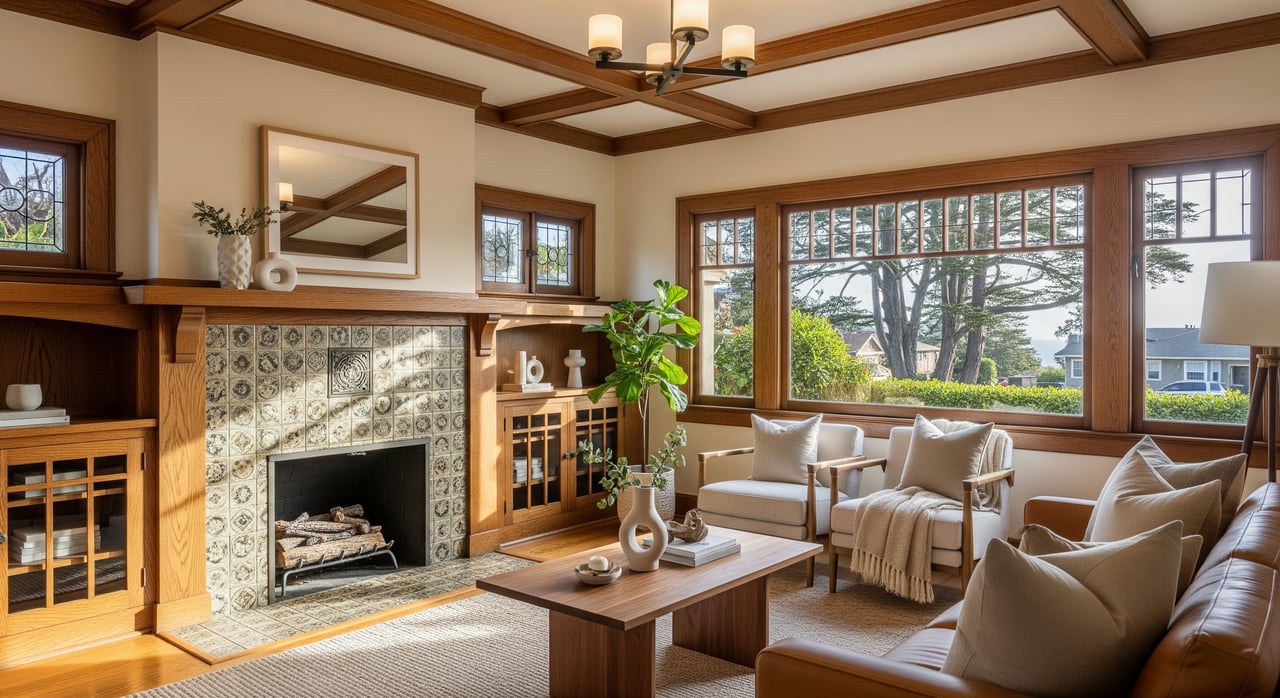
Woodwork and built-ins
Original trim, wainscoting, and built-in cabinetry are major value cues. Clean, condition, and declutter these areas so the grain and detail read clearly in photos. Use a simple, curated shelf mix of books, pottery, and framed art. Avoid heavy decor that hides the wood.
Windows and fireplaces
Divide-light windows and period fireplaces are natural focal points. Remove bulky treatments and use light sheers or shades to let daylight pour in. Angle seating to feature the fireplace in the main living photo, and keep the mantle styling minimal and balanced.
Porches and columns
Tapered columns and generous overhangs set the Craftsman tone before anyone steps inside. Add two chairs or a compact bench, a pair of planters sized to the porch, and ensure the house numbers and porch light are clearly visible. Plan for both daytime and twilight photos.
Room definition and flow
Many Burlingame Craftsman homes have distinct rooms instead of full open plans. That is an asset. Use furniture placement to define purpose and create clear pathways that show circulation. Keep sightlines to windows, built-ins, and the fireplace unobstructed.
Color palettes that photograph well
A restrained, nature-inspired palette supports the architecture and creates listing-photo cohesion.
- Warm neutrals: soft tan, warm gray, and cream for walls and ceilings. If trim is already painted, keep it consistent and light for contrast.
- Earth greens: sage, olive, or muted moss as accents on a feature wall, interior door, or accessories.
- Deep accents: warm navy, deep teal, barn red, or charcoal on the front door or a single focal wall. Use sparingly.
- Natural textures: layered wood, leather, wool, and linen add depth without clutter.
Keep colors consistent from room to room to help your photos flow. Avoid bright, trendy hues that can date quickly.
Lighting that flatters Craftsman
Light is one of your strongest tools. Aim for a warm, cohesive glow that complements wood tones.
- Maximize daylight: clear windows, raise shades, and open doors for airier photos.
- Layer lighting: combine ambient overheads with task lamps and a few accent lights. This adds dimension and reduces shadows.
- Match bulb temperatures: use warm LEDs in the 2700–3000K range throughout the house. Consistency matters in photos.
- Choose period-appropriate fixtures: Mission or simple transitional styles feel authentic. Modern LED options work well if the finishes complement your trim and hardware.
Room-by-room staging plan
Exterior and porch
- Power-wash the walkway, steps, and siding as needed.
- Refresh the front door paint in a deep, welcoming hue that suits your palette.
- Add scaled seating and a simple outdoor rug to suggest daily use.
- Use matching planters with climate-appropriate greenery. Keep beds mulched and tidy.
- Update hardware and ensure the porch light works. Photograph at dusk for a warm, inviting glow.
Living room
- Let the fireplace or built-ins lead. Position the sofa and chairs to frame the focal point.
- Choose correctly scaled furniture. In compact rooms, avoid oversized sectionals.
- Use a rug that allows at least the front legs of seating to sit on it. This grounds the layout.
- Keep mantle and shelves clean and balanced. Remove small, busy decor that reads as visual noise.
Dining and kitchen
- Dining: set a simple tablescape with a runner, neutral dishware, and a single centerpiece. Less is more.
- Kitchen: clear counters except for one or two high-quality items, like a bowl of lemons or a cookbook. Update worn hardware and consider a fresh coat of neutral cabinet paint if needed.
- Use matched, warm bulbs in pendants and under-cabinet lighting for crisp, inviting photos.
Bedrooms and home office
- Primary bedroom: neutral bedding with layered textures, two matching bedside lamps, and minimal art. Highlight closet access and overall scale.
- Secondary bedroom: keep furniture simple to show floor space. If possible, stage one room as a home office or study nook with a small desk and good task lighting.
Bathrooms
- Deep clean and declutter. Replace tired hardware and shower curtains with glass if feasible.
- Use coordinated towels and a small plant for freshness.
- Ensure bright, shadow-free lighting for photos.
Small-bungalow space tactics
- Favor low-profile, open-legged furniture to reveal more floor area.
- Add mirrors thoughtfully to bounce light without hiding original features.
- Define multifunctional zones, such as a tiny mudroom setup with a bench, hooks, and a basket near the entry.
Photo strategy and media
Must-have listing photos
Prioritize clear, well-composed images that tell the home’s story:
- Exterior front during the day and at twilight
- Front porch close-up with seating and house numbers
- Living room featuring fireplace and built-ins
- Dining room and kitchen
- Primary bedroom and a refreshed bathroom
- Detail shots of woodwork, leaded windows, and unique trim
- Usable outdoor areas such as patios or backyards
Stage rooms so key features are unobstructed. Remove personal items, pet gear, and excess small decor that clutters surfaces.
Work with the right pros
Hire a photographer experienced with older homes. Ask them to emphasize natural light and to capture close-ups of architectural details. Consider twilight photography to enhance warmth and curb appeal.
For vacant homes, professional physical staging typically photographs better than heavy virtual staging. If you use virtual staging, disclose it clearly in the listing.
Floor plans and aerials
Floor plans help buyers understand Craftsman circulation and room scale. A few neighborhood context photos can underscore proximity to downtown and transit.
Budget, timing, and local logistics
Staging scope options
Costs vary based on scope and the size of your home. You can choose full staging for vacant properties, partial staging for key rooms, or styling for occupied homes focused on editing, accessories, and lighting. Consult local stagers familiar with historic homes to set the right plan for your timeline and goals.
Timeframes
Allow 3 to 7 days for staging and setup before professional photography. Coordinate around any inspection items or minor repairs. A thoughtful schedule keeps momentum and reduces last-minute rush.
Historic preservation checks
Before exterior changes such as repainting with nontraditional colors, removing trim, or altering porch details, consult the Burlingame Planning Division or local historic preservation resources. When timing is tight, prioritize reversible, cosmetic updates like door paint, lighting swaps, and landscape refreshes.
Quick pre-listing checklist
- Exterior
- Power-wash and repair steps or loose boards
- Repaint or refresh the front door; confirm visible house numbers
- Add scaled porch seating and planters; set a dusk photo window
- Interior
- Deep clean, declutter, and remove personal photos
- Neutralize strong decor and touch up paint where needed
- Edit accessories and bookshelves for calm, cohesive visuals
- Woodwork
- Clean and condition trim and built-ins; refinish if feasible and strategic
- Keep surfaces clear so grain and joinery show in photos
- Lighting
- Replace mismatched bulbs with warm LEDs (2700–3000K)
- Add lamps in darker corners and install dimmers where practical
- Furniture layout
- Scale pieces to room size and float off walls as needed
- Create clear pathways and define each room’s purpose
- Photography day
- Schedule for optimal daylight; open shades and doors
- Hide cords, trash bins, pet items, and countertop clutter; remove cars from the driveway
Common mistakes to avoid
- Painting over well-preserved woodwork without a cohesive strategy
- Overfilling compact rooms with large furniture or too many pieces
- Using bright, trendy colors that distract in photos
- Mixing bulb temperatures, causing color shifts from room to room
- Hiding architectural details behind decor or heavy window treatments
- Skipping twilight photos that can elevate curb appeal
How we help your listing shine
A successful Burlingame Craftsman listing blends authenticity with polished presentation. With design-forward staging, warm lighting, and strategic photography, you can show buyers the lifestyle they want while honoring the home’s heritage. If you want expert support from planning to final photo, partner with a local advisor who understands Peninsula buyers and the Craftsman story.
If you’re ready to elevate your Craftsman for market, connect with Lana Morin Pierce for tailored staging coordination, premium multimedia marketing, and a clear path to launch.
FAQs
What makes Craftsman staging in Burlingame unique?
- Buyers value original details and practical, move-in readiness, so you should highlight woodwork, porches, and period features while signaling modern function.
Which interior paint colors work best for Craftsman homes?
- Warm neutrals with nature-inspired accents, like sage or muted moss, photograph well and complement wood trim without overwhelming the architecture.
How much does staging a Burlingame Craftsman cost?
- Costs vary widely by scope, from full staging to partial or occupied-home styling; consult local stagers to align the plan with your property and timeline.
Do I need permits for exterior changes on a Craftsman in Burlingame?
- Before repainting with nontraditional colors or altering trim or porch details, check with the Burlingame Planning Division or local historic resources.
Is virtual staging enough for a vacant Craftsman listing?
- Physical staging typically photographs better; if you use virtual staging, disclose it clearly and pair it with high-quality professional photography.